4 Common Deadlift Mistakes: Solutions Provided
The Deadlift
One of the world's most popular and great exercises - with the name inspired by the fact that you're picking up dead weight from the floor with zero momentum.
When performed correctly - without getting into the nitty gritty and more specific muscles - it works your hamstrings, butt, back, abdominals and grip strength.
Now, it's not true that you 'must' deadlift, just like you don't 'have' to do any specific exercise (unless you're into powerlifting), nor is the deadlift suitable for everyone, depending on your limb lengths. However, you'd likely do well to include it in your plan.
Why? Because there are many benefits when it comes to the deadlift.
Such as improved posture, increased full body strength, better grip, and other real-world carryovers, e.g. picking up and putting down heavy everyday objects like shopping bags or suitcases or little humans such as the toddlers in your family, something I consider when it comes to programming to my Kairos Online members too.
There are many types of deadlifts, such as Stiff-legged Deadlifts, Romanian Deadlifts, Sumo Deadlifts, Hex Bar Deadlifts, Deficit Deadlifts and Single-leg Deadlifts, to name a few.
Over the following few paragraphs, I will cover the Conventional Deadlift (the more 'standard' version of the deadlift), four of the most popular mistakes often encountered, and provide short video examples and/or pictures of how these mistakes look.
So pay attention, sit tight and keep reading because you may be making one of these errors.
Mistake 1 - Bar Distance/Bar Path
The first widespread mistake you might make is a lack of attention to the distance between the barbell and your body. Bar path is vital when it comes to having a solid deadlift.
Right now, the bar may float away from you as you're performing the movement and/or you may be starting with the bar needing to be closer to your body.
Both of these are problematic.
If the bar floats away from the body during the set, not only will it make the movement feel tougher, but it’ll also add stress to parts of the spine.
This is counterproductive to what you want to achieve from the deadlift.
The barbell should move over the middle of the foot, travelling straight up and down whilst performing the exercise.
To achieve this, your starting position should have your feet slightly wider than shoulder-width apart, your hands slightly wider than your foot position, and the barbell over the midway part of the foot.
The bar should stay close to your body throughout every rep for every set, virtually scraping your legs. Below is a short video example of what you shouldn't do.
Note:
A correct example of the deadlift will be provided towards the end of the article, so keep reading!

Mistake 2 - Lower Back Rounding
When deadlifting relatively heavy weight, minimal upper back rounding may occur - this is fine.
The issue comes in if the rounding happens in the lower back. If this is you, then you'll find that the solution could be one or more of the following:
You're lifting too heavy. Drop your ego and lower the weight.
Some hamstring stretches could help, as the lower back rounding may be due to tight hamstrings, which make it hard to get your back into a more 'neutral' position.
Your glutes may need strengthening. Weak glutes can result in your lower back rounding to compensate for the lack of work your glutes are putting in.
Your focus should be strengthening your glutes via other hip extension-based movements, e.g. hip thrusts and glute bridges.
Do paused deadlifts. Pausing the moment you notice your lower back starts to round could help prevent it from happening in the future.
For paused deadlifts, the weight would be 50 to 60% of your one repetition maximum (1RM) within the 4-6 rep range. If you're unsure how to work out your 1RM, here's a calculator linked for you that you can use by clicking here.
Pro tip:
When trying to get your back into a 'neutral' in-line position, a good tip is to think of it as if you're trying to tuck your shoulder blades into your back pocket as you're reaching for the bar.This action may automatically get you back into a more deadlift-friendly position.
Mistake 3 - Squatting the Deadlift/Hips Coming up too Early
Another error you may make is having your hips shoot up too early. This is often because of an incorrect start position, where you may be borderline squatting. This causes hips to come up first, resulting in your lower back taking most of the load.
However, fixing this is easy - with some practice!
So here's what you should do step by step the next time you go into a conventional deadlift start position:
Ensure that your hips go back (similar to a Stiff-legged Deadlift).
Once you can't get them back any further without feeling a big stretch in your hamstrings (because it's not a Stiff-legged Deadlift you're going for), allow your knees to come slightly forward until your shins touch the bar.
Hold that position.
Once you initiate the pull, your hips shouldn't rise - you should instead drive forward as your chest rises.
The fix for hips coming up too early is to perfect the start position and only initiate the pull with your hips once they're in a higher place.
Mistake 4 - Overextending the Lockout
The deadlift is a movement that includes solid hip extension, meaning your butt is contracted at the top of each rep. However, what you may be currently doing once you hit the top part of each rep is excessively locking out, a.k.a hyperextending your lower back.
This:
Is unnecessary
Causes a lot of stress on the lower back
Although the solution usually comes in the form of either:
Making you aware of the error, which you can then fix.
Not knowing how to contract your butt.
Remember that the top position of each rep is to stand with an upright posture whilst flexing your butt to lock out the hips and having your chest up to lock out the shoulders.
Pro tip:
There's no need to squeeze your shoulder blades together or shrug the weight at the top of each rep. Be mindful of this.

Finally, I Want to Leave You With Three Things.
First.
You'll only know if you're making these mistakes if you record yourself deadlifting. This is why recording yourself doing exercises can help you pick up on errors you may be making that you would have otherwise never noticed. It’s also why I encourage Kairos Online members to do the same.
Second.
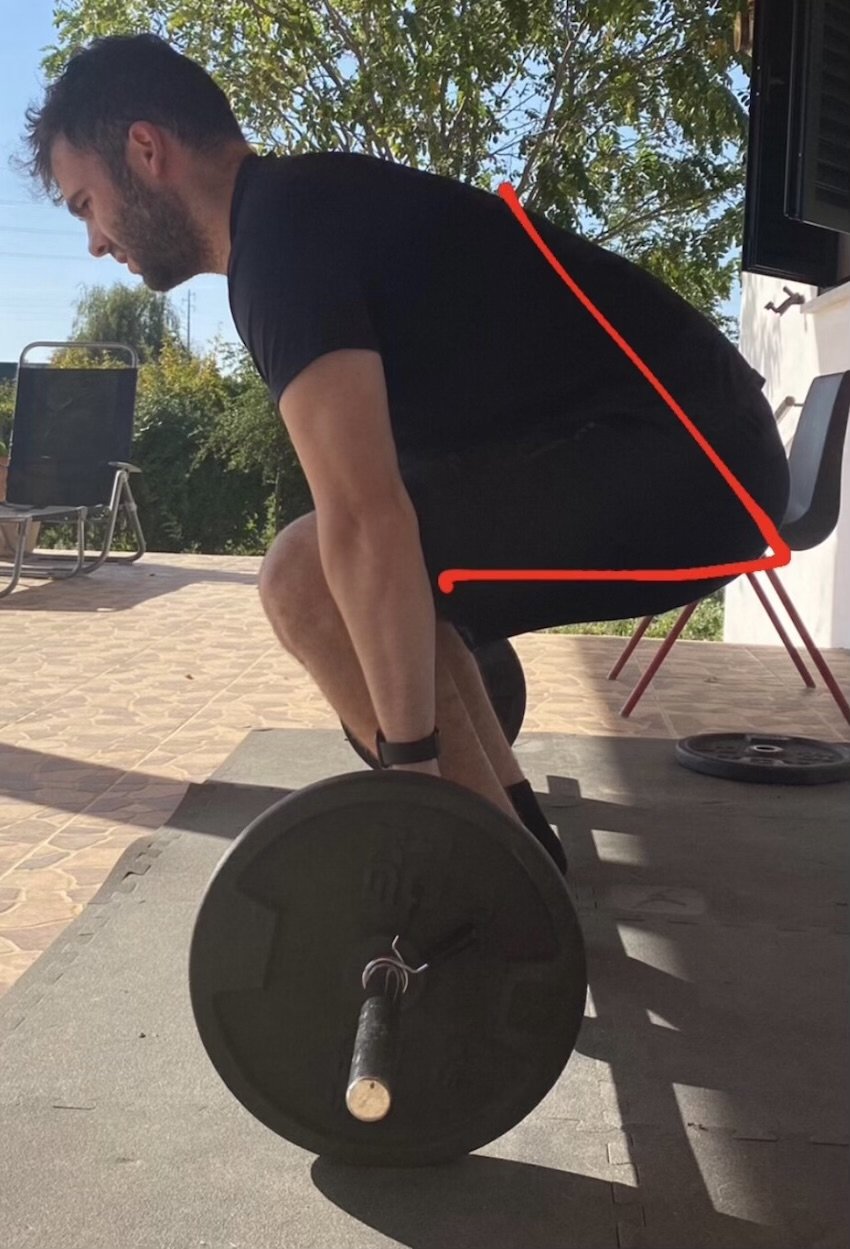
An example of a correct deadlift start position is shown in the images below.


Also, check out this video of a correctly executed deadlift.
Finally.
Even though my example displayed is the correct start position - it's important to note that yours may not necessarily look the same.
Why? Because you'll most likely have different limb lengths than me.
Take reliable Instagram coaches Lee Boyce and Sohee Lee (@coachleboyce and @soheefit on Instagram) as examples.
Look how different their start positions look. Lee Boyce is much taller than Sohee. For example, his hips naturally start much higher than hers due to the longer thighs.

I hope you enjoyed this article.
In the meantime, subscribe to my YouTube channel by clicking here.
Speak soon,
Leo
P.S. If you enjoyed reading this article, please share it with your friends and family :)